wanna keen to learn to code but still confused about where to start ? Don't worry you are at the right blog, I'll be sharing from very basic concepts of coding. weather you have a technical background or not it doesn't matter just stay tuned with my blog, I can bet within a couple of days you will be able to write your own code and with weeks you will start thinking about logic how to solve any problem. Everything you need to know about programming Programming is one of the top leading jobs in the current market, and it's growing every day. It's becoming more and more crucial to have a programmer in your company. And if you take into account that all the biggest companies in the world (Facebook, Twitter, Amazon etc.) are tied to programming, you'll understand the importance of it. That's why we'll try to teach you everything you need to know about programming.Basically, programming is defined as a process of developing and implementing various sets of i...

Introduction to GUI With Tkinter in Python
In this tutorial, we are going to learn how to create GUI apps in Python. You'll also learn about all the elements needed to develop GUI apps in Python.
Introduction
Most of you write a code and run it in a command-line terminal or an IDE (Integrated Development Environment), and the code produces an output based on what you expect out of it either on the terminal or on the IDE itself. However, what if you want your system to have a fancy looking user-interface or maybe your application (use-case) requires you to have a GUI.
GUI is nothing but a desktop app that provides you with an interface that helps you to interact with the computers and enriches your experience of giving a command (command-line input) to your code. They are used to perform different tasks in desktops, laptops, and other electronic devices, etc.
Some of the applications where the power of GUI is utilized are:
- Creating a Calculator which would have a user-interface and functionalities that persists in a calculator.
- Text-Editors, IDE's for coding are on a GUI app.
- Sudoku, Chess, Solitaire, etc.., are games that you can play are GUI apps.
- Chrome, Firefox, Microsoft Edge, etc. used to surf the internet is a GUI app.
Another interesting use-case would be - A GUI for controlling a Drone from your laptop, and the GUI would probably have buttons to maneuver the Drone along with a screen that would show the camera feed captured by the Drone in a real-time.
Let's see some of the frameworks that Python provides to develop a GUI:
- PyQT is one of the favored cross-platform Python bindings implementing the Qt library for the Qt application development framework. Nokia primarily owns Qt. Currently, PyQT is available for almost all operating systems like Unix/Linux, Windows, Mac OS X. It blends the best of Python and Qt and provides flexibility to the programmer to decide whether to create a program by writing a pure python code or use Qt Designer to create visual dialogs.
- Kivy is for the creation of new user interfaces and is an OpenGL ES 2 accelerated framework. Much like PyQt, Kivy also supports almost all platforms like Windows, MacOSX, Linux, Android, iOS. It is an open-source framework and comes with over 20 pre-loaded widgets in its toolkit.
- Jython is a Python port for Java, which gives Python scripts seamless access to Java class libraries on the local machine.
- WxPython, initially known as WxWindows (now as a WxWidgets library), is an open-source abstract-level wrapper for cross-platform GUI library. It is implemented as a Python expansion module. With WxPython, you, as a developer, can create native applications for Windows, Mac OS, and Unix.
- PyGUI is a graphical application cross-platform framework for Unix, Macintosh, and Windows. Compared to some other GUI frameworks, PyGUI is by far the simplest and lightweight of them all, as the API is purely in sync with Python.PyGUI inserts very less code between the GUI platform and Python application; hence, the display of the application usually displays the natural GUI of the platform.
And finally, the framework that is the discussion for today's tutorial Tkinter!
- Tkinter commonly comes bundled with Python, using Tk and is Python's standard GUI framework. It is famous for its simplicity and graphical user interface. It is open-source and available under the Python License.
Note: Tkinter comes pre-installed with Python3, and you need not bother about installing it.
Now, let's build a very simple GUI with the help of Tkinter and understand it with the help of a flow diagram.
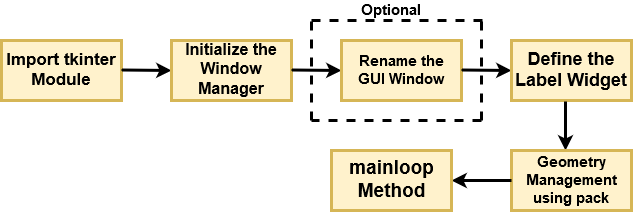
Let's break down the above flow diagram and understand what each component is handling!
- First, you import the key component, i.e., the
Tkintermodule. - As a next step, you initialize the window manager with the
tkinter.Tk()method and assign it to a variable. This method creates a blank window with close, maximize, and minimize buttons on the top as a usual GUI should have. - Then as an optional step, you will
Renamethe title of the window as you like withwindow.title(title_of_the_window). - Next, you make use of a
widgetcalledLabel, which is used to insert some text into the window. - Then, you make use of Tkinter's
geometry managementattribute calledpack()to display the widget in size it requires. - Finally, as the last step, you use the mainloop() method to display the window until you manually close it. It runs an infinite loop in the backend.
import tkinter
window = tkinter.Tk()
# to rename the title of the window
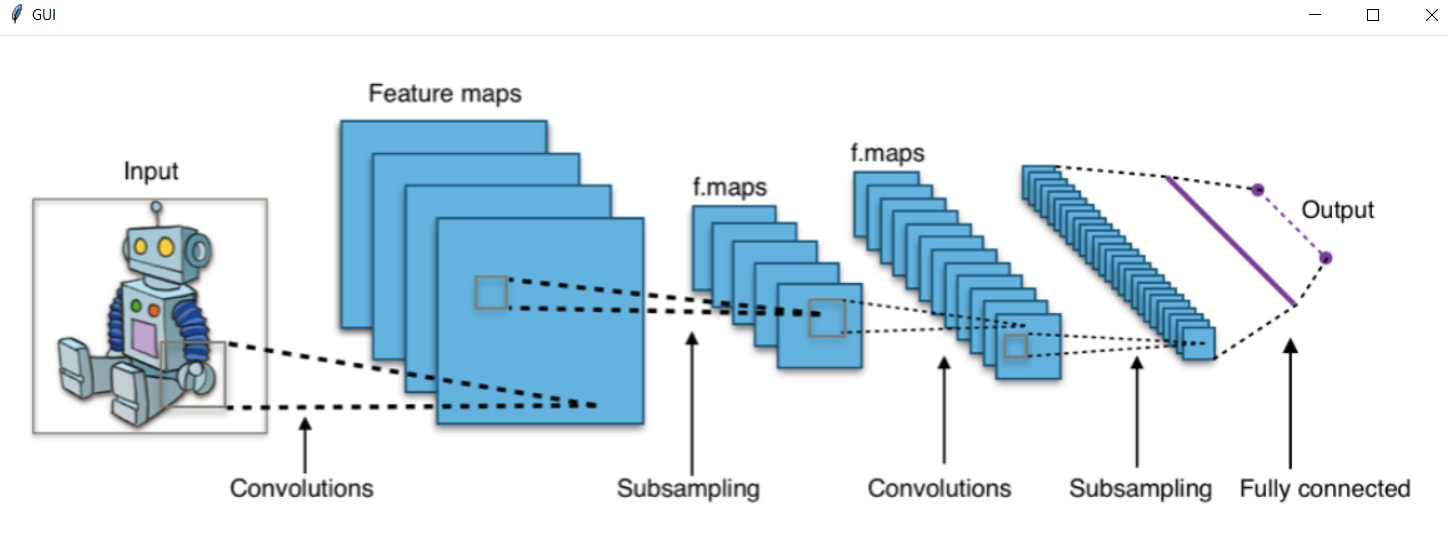
window.title("GUI")
# pack is used to show the object in the window
label = tkinter.Label(window, text = "Welcome to DataCamp's Tutorial on Tkinter!").pack()
window.mainloop()
After running the above code in a terminal, you shall see a similar output, as shown below.
Similarly, you could have a widget Button, and the GUI will display a button instead of some text (Label).
import tkinter
window = tkinter.Tk()
window.title("Button GUI")
button_widget = tkinter.Button(window,text="Welcome to DataCamp's Tutorial on Tkinter")
button_widget.pack()
tkinter.mainloop()
Though you have already learned to use Widgets in Tkinter but let's find out which other widgets are available in Tkinter and the functioning of each of them.
Widgets
Widgets are similar in spirit to elements in HTML. You will find different types of widgets for different types of elements in the Tkinter. They are standard GUI elements and provide the user with controls like buttons, text, menus, and text boxes.
Let's understand all of these widgets in Tkinter, along with an example (Source).
Button: Button widget has a property for switching on/off. When a user clicks the button, an event is triggered in the Tkinter.
Syntax: button_widget = tk.Button(widget, option=placeholder) where
widgetis the argument for the parent window/frame whileoptionis a placeholder that can have various values like foreground & background color, font, command (for function call), image, height, and width of button.Canvas: Canvas is used to draw shapes in your GUI and supports various drawing methods.
Syntax: canvas_widget = tk.Canvas(widget, option=placeholder) where
widgetis the parameter for the parent window/frame whileoptionis a placeholder that can have various values like border-width, background color, height and width of widget.Checkbutton: Checkbutton records on-off or true-false state. It lets you can select more than one option at a time and even leave it unchecked.
Syntax: checkbutton_widget = tk.CheckButton(widget, option=placeholder) where
widgetis the parameter for the parent window/frame whileoptionis a placeholder that can have various values like title, text, background & foreground color while widget is under the cursor, font, image, etc.Entry: Entry widget is used to create input fields or to get input text from the user within the GUI.
Syntax: entry_widget = tk.Entry(widget, option=placeholder) where
widgetis the parameter for the parent window/frame whileoptionis a placeholder that can have various values like border-width, background color, width & height of button etc.Frame: Frame is used as containers in the Tkinter for grouping and adequately organizing the widgets.
Syntax: frame_widget = tk.Frame(widget, option=placeholder) where
widgetis the parameter for the parent window/frame whileoptionis a placeholder that can have various values like border-width, height & width of widget, highlightcolor (color when widget has to be focused).Label: Label is used to create a single line widgets like text, images, etc.
Syntax: label_widget = tk.Label(widget, option=placeholder) where
widgetis the parameter for the parent window/frame whileoptionis a placeholder that can have various values like the font of a button, background color, image, width, and height of button.
You can find the complete list of widgets at the official Python documentation.
Geometry Management
All widgets in Tkinter have some geometry measurements. These geometry measurements allow you to organize the widgets and throughout the parent frames or parent widget area.
For this purpose, Tkinter provides you with three main geometry manager classes:
- pack(): It organizes the widgets in a block manner, and the complete available width is occupied by it. It's a conventional method to show the widgets in the window.
- grid(): It organizes the widgets in a table-like structure. You will learn about it in detail later in this tutorial.
- place(): Its purpose is to place the widgets at a specific position as instructed by the user in the parent widget.
Organizing Layout And Widgets
In this section of the tutorial, you will make use of both geometry and widgets, and let's see the magic of Tkinter.
To arrange the layout in the window, you will use a Frame widget class. Let's create a simple program to see how the Frame works.
You will define two frames - top and bottom with the help of the
packclass. The Frame class will help in creating a division between the window. Basically, a single-window will be replicated twice as top and bottom in the form of a Frame.Finally, you will create four buttons in the window, two for each frame. You can name and color your buttons as you like as a parameter.
Grid
Much like a Frame, a grid is another way to organize the widgets. It uses the Matrix row-column concept. Let's draw some analogy between the grid class and the row-column idea with the help of the below diagram.

Grid primarily takes two parameters row and column. As shown in the above figure, imagine 00 corresponds to the first button while 01 to the second. And to place two buttons side-by-side, grid will take row and column parameters as 00 and 01, respectively.
Let's make use of checkbutton to understand how grid class works. You will define two checkbuttons and specify some text for both the buttons. The state of the check buttons will be decided by the onvalue and offvalue while the current state of the checkbutton will be tracked by IntVar(), which will be stored in a separate variable. When the offvalue=1 and the onvalue=0 corresponding checkbutton will be ticked.
Now coming to grid class, you will pass a parameter row, which will position the button in the first row if row=0 and in the second row if row=1.
Binding or Command Functions
Binding or Command functions are those who are called whenever an event occurs or is triggered.
Let's take an example to understand binding functions.
You will define a button which, when clicked, calls a function called DataCamp_Tutorial. Further, the function DataCamp_Tutorial will create a new label with the text GUI with Tkinter!.
Apart from invoking binding functions with a mouse click, the events can be invoked with a mouse-move, mouse-over, clicking, scrolling, etc.
Let's now look at the bind function, which provides you the same functionality as above.
Mouse Clicking Event via the Bind Method
The Bind method provides you with a very simplistic approach to implementing the mouse clicking events. Let's look at the three pre-defined functions which can be used out of the box with the bind method.
Clicking events are of three types leftClick, middleClick, and rightClick.
<Button-1>parameter of the bind method is the left-clicking event, i.e., when you click the left button, the bind method will call the function specified as a second parameter to it.<Button-2>for middle-click<Button-3>for right-click
Now, you will learn how to call a particular function based on the event that occurs.
- Run the following program and click the left, middle, right buttons to call a specific function.
- That function will create a new label with the specified text.
Alert Boxes
You can create alert boxes in the Tkinter using the messagebox method. You can also create questions using the messasgebox method.
Here you will create a simple alert-box and also create a question. For generating an alert, you will use messagebox function showinfo. For creating a question, you will use the askquestion method, and based on the response to the question, you will output a Label on the GUI.
Rendering Images
If you have been able to follow along until here, then, adding images and icons to the GUI should be a piece of cake. All you need to do is use the PhotoImage method of Tkinter and pass the file_path as the parameter to it.
Well done if you were able to follow along till here!
Comments
Post a Comment